

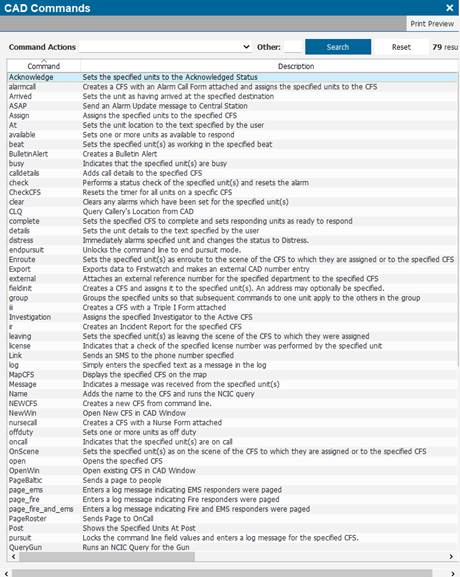
CAD Commands can be configured based on the agency’s needs and are accessible from the command line on the CFS.
![]()
CAD commands can be created to run several of the most common NCIC queries from the command line: driver's license by name, driver's license by OLN, vehicle registration by plate, and vehicle registration by VIN. They can also be configured to send pages, set unit statuses or open CAD windows.
You are able to view the CFS window as a non-embedded window, similar to a CAD window. This allows having several CFS windows open side-by-side when you are working multiple calls at the same time. This can be done using a new CAD command action called Open CFS CAD window, which can be used as a stand-alone command or existing to current commands.
A custom CAD action is available that allows you to open a CFS that a specified CAD unit is assigned to. This allows creating a command for opening a CFS by entering a unit number rather than a CFS number.
A setting can be changed to retain field values when switching from one command to another. For example, if you had entered "Command: On Scene, Unit: U8, CFS Number: 201304986," but realized before issuing the command that you meant to mark the unit as Assigned rather than On Scene, you could simply change the Command drop-down without having to re-enter the Unit and CFS number. The Recent command described above works especially well with this setting enabled because you can recall a previously issued command and change the Command dropdown without changing the other values. This would allow you to take a previously issued Enroute command and easily turn it into an On Scene command. Please contact CentralSquare Technologies to enable this setting.
Currently, when a unit is stacked to a CFS, it is automatically assigned to that CFS as soon as it becomes available. A setting is available to disable auto-assigning units to their stacked calls.
Warning: It is recommended to create and test new commands on the training server prior to creating the commands on the production server.
Permission: Admin – System – CAD Commands is required to modify or create CAD commands.
1. Navigate to System Admin > CAD > Commands. Already configured CAD Commands will display in the list and can be edited by double-clicking or deleted by highlighting blue and selecting Delete on the keyboard.
2. Select New CAD Command.
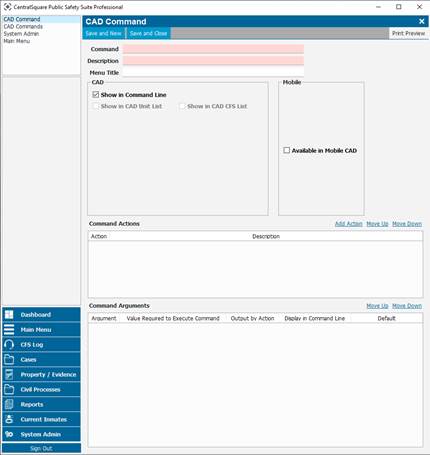
▪ Command: Name of the command which shows up on the command line.
▪ Description: Describes the command in full detail and shows up on the command line under the command.
▪ Menu Title: The title of the command as it shows on the command log tab.
▪ Available In Mobile CAD: If the command should be listed in Mobile CAD.
• Button Title: What the button should be called in Mobile CAD.
• Agencies Using this Command: You can specify which agency will see the command and which won't, helping systems that have multiple agencies using it.
● Command Actions: Determines what actions the command performs.
1. Select Add Action.
2. Scroll through the list to select the specific action(s).
3. Additionally, if selecting Run External Query to set up an NCIC command, a query drop down will appear on the bottom of the Command Action window to allow users to specify.

The system will give you an error if you try to place actions in a specific order that do not make sense.
● Command Arguments: Data that must be specified in order to execute a command. Arguments can display in the command line as opposed to being specified under system admin or hidden.
1. Select the display order and any defaults for the arguments.
2. Some of the commands requires specific information be made visible which is controlled by the arguments and the system will provide a warning if you try to save a command before configuring those arguments.
Note: The mileage function can be turned on in the Set Unit Status portion of the Command Action.
CAD Command examples:
Adding Zoom to existing Commands: This will auto zoom the map to the location of the unit affected by the command issued from the CAD station.
1. Select the specified CAD Command (Assign, Enroute, Scene, etc.).
2. Select the Add Action option.
3. Use the scroll bar to find and select Zoom to Unit.
4. Restarting PS Pro Suite will be required for the new Command Actions to take effect per machine.