

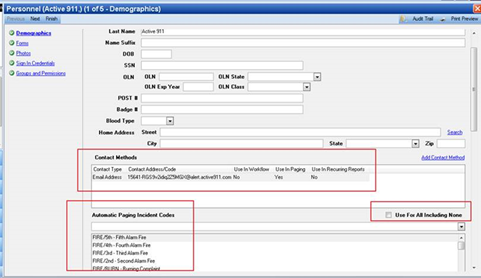
The first step of automatic paging configuration is to set up the designated personnel with the Contact Method(s) they use to receive pages. This is also where you may set up automatic paging based on incident codes, where every time specified incidents occur, the allotted personnel will be sent a page
1. Navigate to System Admin > Personnel > Personnel.
2. Select Create a New Personnel.
3. Select Add Contact Method and add an email address or SMS address for the person or agency receiving the page.
● The Automatic Paging Incident Codes can be set to individual personnel to send automatic pages anytime a specified incident occurs.
Note: This is not tied to responding unit based paging. This section is commonly used to send pages to Administrative personnel when a major incident is occurring.
4. Select the Incident Codes for which the user wants to receive automatic pages.
Note: If the user NEVER wants to receive automatic pages, make sure the Use for All Including None box is unchecked and no incident codes are in the list box. If you do not uncheck this box, then they will receive pages for EVERY incident code.
5. Finish the Personnel Record.
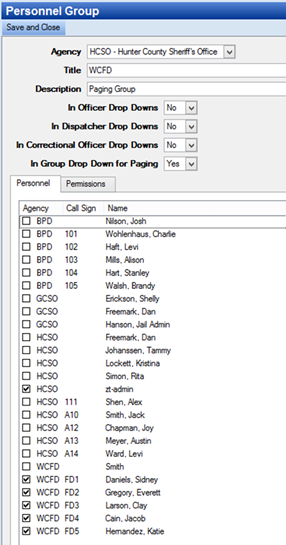
The next step will be to create Paging Groups, which are Personnel Groups that are only used for responders that receive pages.
1. Navigate to System Admin > Personnel > Personnel Groups.
2. Select New Personnel Group.
● Title = Create a Paging Group name
3. In Groups Down Downs for Paging = Yes.
4. Select the personnel record(s) for the group.
● You do not need to grant permissions.
5. Select Save and Close.
Next is to set any CAD Units to a respective Paging Group.
1. Navigate to System Admin > CAD > Units.
2. Double-click a Unit that needs to receive pages.
3. Select the specific paging group in the Paging Group field.
4. Select Ok.
● Do this step to EACH unit that wants to receive automatic pages.

● Automated pages will need a default message type assigned in order to determine what content will be sent to responders.
5. Navigate to System Admin > CAD > Paging Message Types.
6. You may either create a new Paging Message Type or alter one of your current message types. Add tags to the message to import real data from a CFS into the message.
● Make sure you select the Use as a Page Responders Default option.
7. Navigate to System Admin > CAD > Commands.
8. Select the Command that you wish to create the page. If a Unit needs to recieve a page on initial assignment, select the command that sets the assignment (ie: ASSIGN, DISPATCH, D)
9. Select Add Action.
10. Select Page Units or Page Group. Page Units will only page the Units that you assign to a CFS and the Unit will be attached to a Paging Group which will trigger the page. Page Group will page all Units attached to a group. This would be beneficial if an entire department needs to get automatically paged when their Units are assigned to calls.
11. Select Save and Close.